“Rib Correction” simply means restoring healthy muscle tone and range of motion for restricted ribs. Clients will often say they have a “rib out” they want your help with. They aren’t really “out”, as this would be a medical emergency and the client should be @ the ER. They are most likely restricted ribs and if they are “out” of anything, it would be “out of sync” with the rest of the body’s coordinated motion.
Your clients know these spots well, they’re an old familiar sensation, often tender or hot spots that flare by the end of the work day between their scapula and spine or further down their back. Maybe they only notice them during treatments and will say “My other (provider) always finds those spots too.” Maybe they’re so familiar they’ve even nicknamed them. I had a client that called his “Gibraltar” and “Plymouth” (two famous rocks) when I first met him.
Novice therapists are often confused by these re-occurring back “knots” and get frustrated by their stubbornness to release, no matter the amount of rubbing. That’s often because it’s a bony landmark pulled out of alignment by excess tension and you shouldn’t be trying to massage it away!
Remember, ribs have many roles. They hold and help move head, neck, spine, scapula, arms, and pelvis while supporting hip and leg movement as well. This all while being responsible for protecting our tender vittles (vital organs) and maintaining their primary responsibility: breath and breathing ROM. Let’s remind ourselves of all they hold with this video:
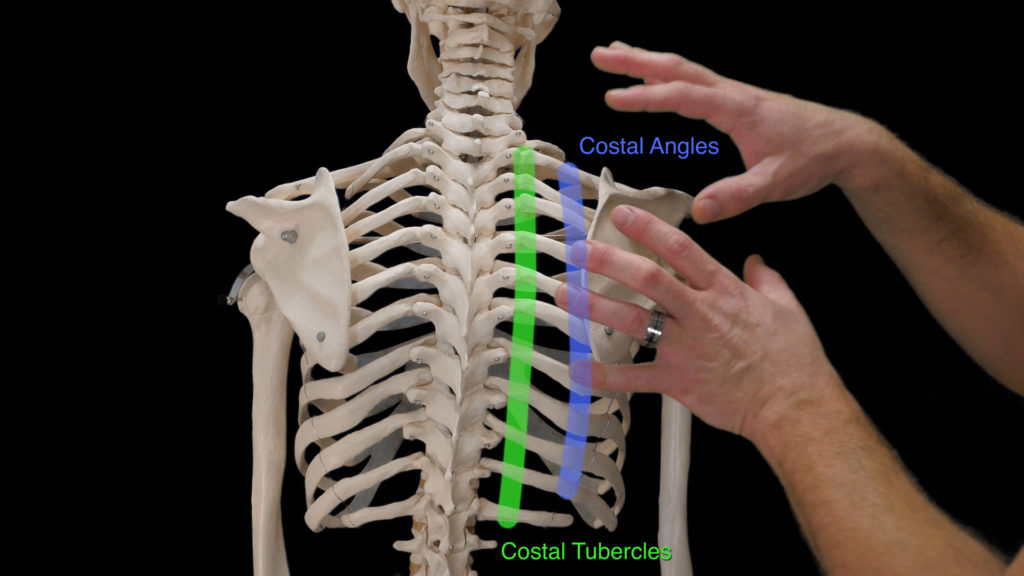
When stressed with too many holding/moving responsibilities, ribs will often brace and guard the costal vertebral joint with excess tension. You can think of the excess tension as impacting the rib into the joint. The costal tubercles and angles of impacted ribs can be felt more posterior and medial when compared to surrounding ribs that aren’t impacting their costal vertebral joint. Impacted ribs will also palpate to be held more tightly, and you will feel less squish/give when impacting the costal vertebral joint passively.
There’s only one group of muscles that would seem to have the leverage to pull the tubercle more medial and posterior, while creating familiar reports of tenderness when palpating tubercles: Levator Costarum Brevis and Longus.
Levator Costarum originates on the Transverse Processes of C-7 through T-11, Insertion of Brevis is between the tubercle and angle of the rib below, Longus inserts between the tubercle and angle two ribs below. According to Nitz and Peck 1984: https://onlinelibrary.wiley.com/doi/pdf/10.1002/jmor.1051800307, “A small short muscle frequently acts across a joint in parallel with a vastly larger and longer muscle; therefore it should play a minimal role in the mechanical control of that joint. This study provides evidence suggesting that the small member of such a “parallel muscle combination” (PMC) may serve an important sensory feedback role.” It is found that the paraspinals and PMC intrinsics have a higher concentration of muscle spindle cells and most likely serve the role of “kinesiological sensors” providing important proprioceptive information.
Levator Costarum has unique positioning to monitor costal vertebral joint tone and motion with it’s greater concentration of Muscle spindles. The Basic Rib Technique can be thought of as a Direct Manipulation technique of Muscle Approximation to help reset Muscle Spindle tone of the Levator Costarum.

Here’s my favorite technique shortcut intended to free rib ROM, utilizing breath. By working directly with this primary rib motion, a majority of restricted ribs can be mobilized very easily. For more difficult and stubborn ribs, see Technesoma Advanced Rib Correction Techniques, where you’ll learn to release them in context with their other roles (coming soon).
Follow along with the video demo and enjoy your practice assessing rib mobility and alignment, and facilitating release through breath:
A written description of the technique is below.
Technique Steps:
*No part of this work should be painful, the most intense sensation you want to work with is what most clients call their “Hurts so good point.”, I call it “Appropriate stretch feeling.” like when you stretch a muscle and it can feel tender, maybe a little hot, but has the quality of feeling appropriate in both mind and body. in other words- it must be safe for owner-operator to associate with their feelings and movements.
- Warm up tissue and outer layers releasing shoulder girdles prior to deeper rib work. (Use your favorite techniques to do so.)
- Once outer layers have released you will have easier access to palpate costal tubercles and costal angles evaluating if they make an orderly line or if one or more feels pulled medial and/or posterior.
- Once you’ve identified a suspect or two, check the mobility of the surrounding ribs as compared to the “out of line” ribs. Passively impact the ribs into the costal vertebral joint comparing give or squish. You’ll be able to palpate which ribs are being held by hypertonic tissues, and validate your alignment finding. Check in with the client about their sensation as you palpate the out of line ribs (the costal tubercle is often the most sensitive point), they will usually report it is tender, painful, or feels “solid/stuck” compared to surrounding ribs and muscles.
- Once you’ve assessed which ribs to treat, help your client tune into and feel the bones proprioceptively (assessment will already have accomplished much of this), so they may fully participate and be able to connect to the work and release. Do this by palpating the rib as you describe its path and shape “like a horseshoe that wraps the whole side of the body” that you will ask them to expand in all directions with a maximum inhale, when instructed.
- Passively and comfortably impact the costal vertebral joint to be released, place your opposing hand on the contralateral (opposite) lamina of the involved vertebrae. (Remember each rib articulates with two vertebrae so a less precise, broad contact is fine, you just want to ensure you can feel the ability to rock/rotate the group of vertebrae involved.)

- Once positioned instruct your client to take a maximum inhale, expanding in all directions, pushing outward with breath on their rib, just as hard as you are pressing in. As they breathe keep constant pressure on the rib and rock the lamina gently back and forth through the entire breath.
- As the client reaches the end of their exhale, your constant pressure you’ve kept on the rib and costal vertebral joint should allow you to follow the rib and feel the joint soften as it squishes more easily anterior with release, then floating out into the nice orderly line of bony landmarks.
- Recheck the sensation of your client, if you felt the joint soften and the rib realign, they’ll often be amazed at the reduction in tenderness or that you made that “spot disappear!”. Do treat all ribs you find to be less mobile, they often run in packs!
If you are having difficulty getting ribs to release, please see Technesoma™ Advanced Rib Corrections Techniques (coming soon). This basic breath technique is an effective “keystone technique” that can unlock and share slack with multiple patterns that ribs may be involved in, but occasionally ribs want more work addressing the other roles they’re responsible for before they’re ready to release and behave like good ribs.
Protip: This technique is super effective for onsite chair massage too! Bring it and amaze!
Here are Self-Care Awareness Exercises to help your client maintain and cultivate rib tension changes:
Breath Surfing:
Increases breath awareness, cultivate differentiation between thoracic and abdominal cavity musculature and increase Rib ROM.:
The Chair in Your Knees:
Inspired by Martial Arts and Myofascial Anatomy, the Chair in Your Knees is a favorite exercise useful for increasing stamina and comfort while standing at Sit-Stand desks, doing dishes, cooking, etc., in addition to helping:
-Cultivate presence in base of support (feet, legs, pelvis, spine, ribs).
-Cultivate awareness of center of gravity and balance.
-Increase strength and adaptability of the spine.
-Relieve low back, sacroiliac (SI joint), hip and leg pain.
Follow the video to learn the exercise. Don’t force it or try to power through frustration. If you get fatigued or experience pain, stop the exercise and wait until you’re refreshed to try it again. It becomes easier with repetition and I’m excited for you to feel the benefits of your practice. If it hurts don’t do it.
Once a client can find a comfortable chair in their knees, further spinal and costal options for movement and release may be cultivated with the:
Psoas Strengthening and Release Exercise:
An awesome and informative stretch for both releasing and strengthening core & Psoas. Releasing the and strengthening the anterior spine reduces the need for antagonist tension in the Erector Spinae Group and their costal/vertebral attachments. Watch the whole video and read all of the instructions that are on the screen during the video before working with this exercise. Perform with care and attention.
Think of it as training Softainability for your spine and ribs:
Be water my friends. If your client’s rib tension seems connected to shoulder and arm tension/movement patterns, they may benefit from The Disco Exercise. It helps train Softainability by differentiating glenohumeral joint motion and musculature from scapular motion and musculature.
The Disco Exercise:
Learning to efficiently push and pull with our arms reduces the load placed on their costal moorings, and reduces need to brace costal -vertebral joints.
The above Self Care Exercises can help address the pelvic and arm factors contributing to rib pain. The exercises below can help address cervical and head-posture factors.
Headache Relief:
Balancing a skull on top of a vertical cervical spine reduces costal loading that comes from Head Forward Posture and increased tension of cervical musculature with costal origins. Sometimes workplace habits contribute to the stressful and uncomfortable tension patterns. Help Clients identify ergonomic habits that create additional costal tension:
Nasty Habits:
If they’re asking for self-care they can use for cervical and head posture factors that contribute to their rib tension and pain, share this self-release:
Neck and Shoulder Pain Self-Release:
A simple technique for cervical and 1st and 2nd rib pain/tension that can be very useful for reducing tone of muscles that attach our head and neck to spine and ribs.
I hope you have found this technique and accompanying self-care useful. Please don’t hesitate to reach out with any questions you have, and happy “Rib-Correcting”!
+Many thanks to those that taught me to work with ribs: Til Luchau, Jon Hart and Bud Bedell.
Move on to take the quiz: